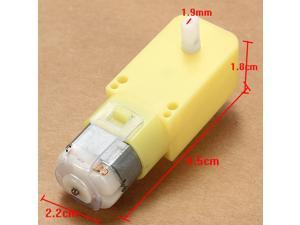
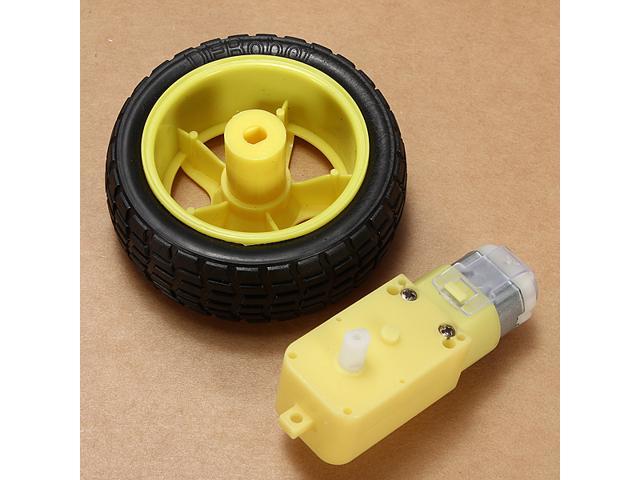
So I've recently focused on using the "130 size" motors that are widely available to power my robots.
I ran into one major issue today though. With the robot fully loaded (I put a pretty hefty battery on it, about 115 grams) the load was excessive, and within 1-2 minutes of use the motor overheated. As it overheated, the robot began to slow down. Eventually, the motor shorted. When it did the motor driver was zapped. In this particular instance, the motor driver then shorted the motor voltage line to the Wixel, which zapped the Wixel too. The magic smoke was released, and the electronics were no more. How disappointing.
My robots were operating at the "Heavy Load" region; bad news
Mostly though I was bummed out to find that I need to do a lot of redesign, ASAP. Pride can get in the way here, and I'm conscious of that. Just because I sank a lot of time into a design, doesn't mean I should be hell-bent on polishing it until it more or less functions. Perhaps it is time to take things in another direction, as frustrating as that is to admit.
So, I did a little more late night reading. I started by returning to this video, which shows a robot that appears to be made with CD drive motors, belt drive, bottlecap wheels, and a bead caster. It is zippy, seems to feature some kind of lightweight battery, and it seems 'low cost.'
However, I can't seem to find cheap brushed CD motors in bulk. The salvage on eBay is surprisingly expensive, and also not always sold in uniform lots. The process of salvaging is time consuming and parts may not be available to all.
Below is a motor/wheel/gearbox that is probably a really good option. It seems to use the 130 size motor or something similar, though I haven't gotten a sample set of these yet. At $3.xx if you buy them in groups of at least 2 (that includes ePacket shipping; these mostly ship from China), that isn't a bad deal. Ultimately given the time and plastic costs with 3d printing wheels and gearboxes, I think I should have been trying these out.
I think perhaps I had a bit of confusion as the MOARbots mission evolved. In the beginning, I was really keen on using some of my collection of motors, many of them salvage. Over time I realized that I specifically wanted to avoid salvage for reproducibility reasons. Part of that was reading over so many unhelpful and poorly written Instructables...
Pictured above is
SWARMbot from AFRON 2012. It uses some
very small motors hooked up to bottle caps with direct drive, and runs on a single LiPo cell. Direct drive is something I found really tricky with bots on a larger scale, and I wonder how much weight you can put on this thing before it stalls. Depending on your needs, that may or may not be a problem.
This was the other intriguing design from AFRON 2012, the
LollyBot. I mostly liked the style of drive with the rubber tire friction. I was pretty surprised to see the price on the cheap dual stick controller listed as about $3.80...the link didn't work for me, so I don't quite believe that price yet...
At this point I was feeling a little bad, so I decided to remind myself of what MOARbots is still important for. Here's a list:
1. A collection of modules, resources, and general knowledge instead of a single model of robot.
Up to now I've still had trouble finding information about what to buy, where to buy, design considerations, how to pick and choose, etc. Even with some of the excellent designs above, they provide just instructions on how to build their design. One of the goals of MOARbots is to generate a big, easy to navigate set of resources that help you understand how to successfully pick and choose design elements. I'm learning a lot in this process that I want to share, but I don't think a big rambling article is the way to share it. I need to think of a good format.
2. Digital wireless while maintaining low cost / Code
The Arduino is very popular, but adding it with some wireless module costs more money. Because the Wixel was actually a little cheaper and included a wireless radio, I decided to go with that. The Wixel community is a whole lot smaller than the Arduino community and it shows. Hopefully part of what this project will do is contribute to that community the sorts of resources that people doing robotics projects similar to MOARbots will need. What is needed? Mostly glue between existing code modules that others have written, instructions to make use easier.
Of course, if I can find the time, I'd like to also start trying to switch the Wixel out for the
ESP8266 instead. as I've mentioned before. Pointing people toward/providing a tutorial for getting started with AprilTags could also be a goal. By using something and inviting others to follow you add to a community, and then the community turns around and contributes back things you find useful, most importantly perhaps being posts on the internet about solutions to problems.
3. Cheap omniwheels
I left my omniwheel project alone a while back to focus on the other aspects of MOARbots, but as far as I can tell cheap 3d printed omniwheel designs still aren't really available online. Of course by the time I have a chance to finish mine, I'll find out somebody else finished it for me. But you saw it here first folks! 3D printed plastic plus finishing nails and rubbery heat shrink. That is probably my most original mechanical design contribution.
My omniwheel design.
4. Alternatives/Redundancy/Options
I think it is better to have more options than just one. Users will surprise you, and you can't really predict the things an arbitrary person searching the internet for low cost DIY robots will need out of a framework/platform. Having a lot of alternatives is a good thing.
Wrap-up: what's next? Well, the most pressing issue for me is to fix my fleet of 10 robots with overheating motor issues. I'd like to use the same parts because they have already been purchased, so I'm not switching now to a design that is too drastically different.
One final thought: I want to reiterate how important it is to have a central knowledge base that is easily navigable. I keep finding gems hidden in obscure forums online. From the link describing
this video, this description : "
Its a belt drive car. Used a bobbin from a sewing machine on the axle and used a bicycle tube cutout as the belt. This is working for now, but I need to find something a bit better as the connection between the motor and the axle is too loose."
I wish the internet had a good user uploaded content driven website focused on listing 'household' items tagged with different uses for them. Then you could see more by following links to builds and writeups. You could also watch prices and find sources for buying in different quantities.
Last edit: two links I wish I had read in detail earlier on:
http://www.phidgets.com/docs/DC_Motor_and_Controller_Primer
http://lancet.mit.edu/motors/motors3.html